
Here is my 2nd kitbash , this time of Near from the anime manga Death Note. To create Near, I modified an existing resin model kit using magic sculpt. Anything that is in grey is what I sculpted with magic sculpt. Anything in white is the original kit and not sculpted by me.
Working time was two months from April 2008 to June 2008. Base coats were airbrushed with acrylic paint and the shading done with calk pastels.The original model kit was 1/8 Amasato Nagomi, from the anime series Girl the Gathering, produced by Hobby Japan.
Materials used:
-Sand paper 100, 220, 400 grit,
-Hobby knife with blade size 11 and 2
-Clay shapers flat chisel firm type (in black color) size 0 and size 6
-Magic sculpt
-nitrile gloves- needed when handing epoxy putty
-Vaseline- needed to keep parts separate while puttying
-Water- needed to smooth magic sculpt
-Brushes- needed to smooth magic sculpt
-16 gauge wire- used for pinning.
-Hand drill- used for pinning
-Paper towels
Near is a character from Death Note, copyrighted to Tsugumi Ohba and Takeshi Obata. This is a Fan Sculpture, not for sale. Here is the WIP
 I didn’t take separate pictures of the base model, but it was in a great Near pose already.
The base model was a girl though, so I sanded the chest flat.  The original kit’s face had a sleepy expression with the eyes more closed. So I carved out the eyes and resculpted the eyelids to make them more open. I also added more hair strands to the existing hair, so that there is more volume.
  The cheeks needed to be sanded. The back hair was too long so I cut it off.
  For the hair, I kept on added new hair strands one by one with magic sculpt.
 Here is the back view of Near’s hair. It was a lot of fun sculpting his hair.
  Now I had to readjust the arm. I cut it at the elbow and attached the two halves with a pin. Then I filled in the blank space with magic sculpt.
  I tried to sculpt in the clothes folds to match the resin model. For the shirt sleeve ends, I cut off the part that was there and re-sculpted a new one. The original end was closed, but I re-sculpted the area more open. You can see this better in a later picture.
  The bend leg was good and I did not need to modify it. The other leg was originally hanging down. I rotated it so that the leg is not sticking out to the side. I cut the leg at the knee joint and repositioned the part. The foot originally had a slipper on, so I sculpted the toes in.
  Rotating the leg created a big gap between the leg and the shirt. I brushed on vasline and applied magic sculpt to the leg. I had to cut off the end of the shirt, and then sculpted it back in so that the leg could fit better.
  I had to sculpt the shirt collar from scratch. If I am remembering correctly, I think at the time, the original collar pieces need to be glued after the head was already in place. I wanted to keep the parts separate for painting, so I sculpted the collar so that the head could still fit while the collar was already in place. Quite a few kits have the shirt collars as separate parts and I always find it challenging as to what order I need to paint and glue.
  Here you can see that the sleeves are more open instead of the original closed look. Also you can see that I had to add a bit of magic sculpt to extend the original shirt over the leg.
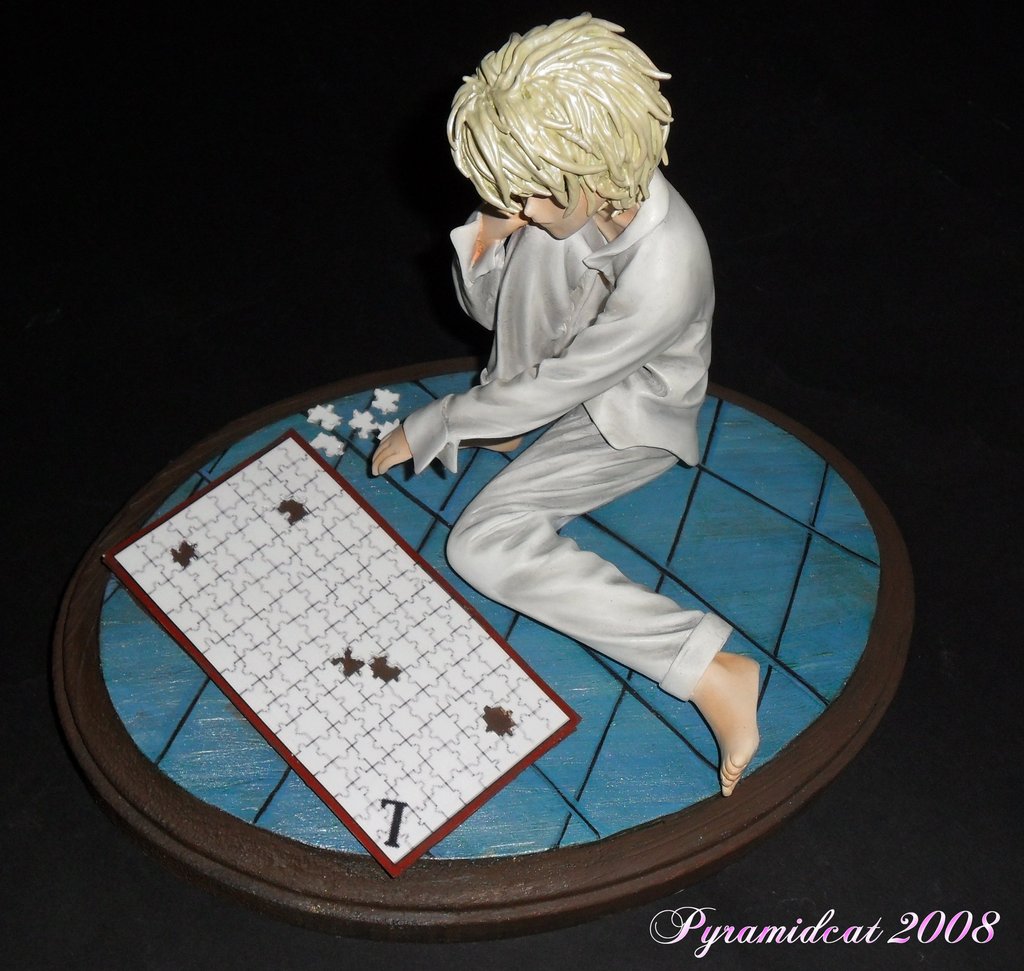
  For the puzzle I first tried to do a fabric paint one, but it came really bad. Next I tried to do a magic sculpt one. I think I could have done it well if I spend a lot of time sculpting it, but I did not think it was really worth that kind of effort.
  So I drew the puzzle in Paint Pro 7 and printed it on matte photo paper. I then glued the puzzle picture very thick cardboard. I cut out some puzzle pieces with the hobby knife.
  and Near is not basically done. I check the arm positioning to make sure it looks like he is putting together the L puzzle.
  everything looks good so far. The magic sculpt is what is in grey. The white is the original resin kit.
  Near is ready for painting. You can see the tubs of magic sculpt in the background. I usually get the 5lb tubs. It seems to get stiffer over time, so I dont like to buy more than 5lbs at a time. 1lb will get used up too quickly.
  Here are just some more angles of completed Near before painting.
  I airbrushed the skin first and then I painted the white. I did a mix of anime and manga colors. He wears white pants in the manga, but blue pants in the anime. I only airbrushed the base coats and then I shaded with chalk pastels. I really liked the chalk pastel shading, but I;m too afraid of inhaling the dust, so I dont use them so much.
  I couldn’t decided what color to paint Near’s hair. I wanted it to be a pale blonde like in the anime, not completely white like in the manga. This is my final WIP image. I liked the hair color I ended up getting in the finished pictures. It is iridescent and the shade I wanted.
Completed Pictures


Thanks, you sharing very interested WIPs!
Just subscribed to RSS feed.